
Desserts
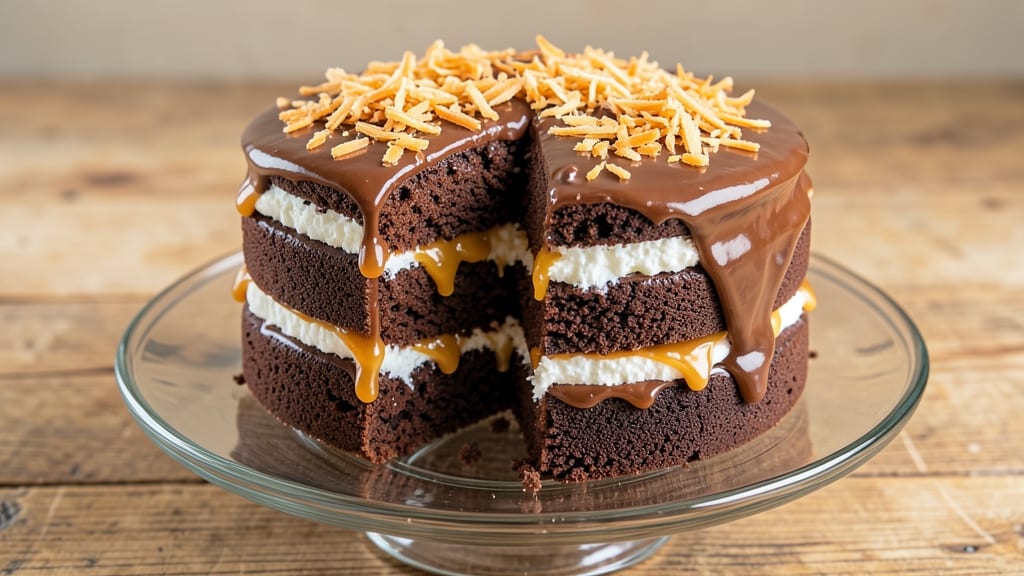
This Bounty chocolate cake recipe brings the iconic tropical flavors of the candy bar to your dessert table with rich chocolate layers and a velvety coconut frosting. 💛 The secret lies in balancing dense chocolate cake with the creamy coconut filling that mimics the original treat's texture—moist, decadent, and impossible to resist in just one slice.
What makes this recipe special is the two-layer approach: a fudgy chocolate cake base and a lighter coconut-infused layer, all sandwiched between a luscious coconut cream frosting.
Whether you bake from scratch or use a boxed mix for convenience, the result is a showstopper that tastes like a vacation in every bite.
The cake itself is rich but not overly dense, while the coconut filling adds a tropical twist that keeps the texture tender. The frosting, made with coconut milk and powdered sugar, creates that signature Bounty creaminess without being too sweet.
Perfect for celebrations, family gatherings, or indulgent weeknight treats, this cake pairs beautifully with a cold glass of milk or a tropical cocktail like a piña colada. Let's bring that nostalgic candy bar flavor to life in cake form!
Ingredients for bounty chocolate cake
Rich chocolate layers meet tropical coconut cream—this cake delivers nostalgic Bounty magic.
| Ingredient | Amount | Notes |
|---|---|---|
| All-Purpose Flour 🌾 | 2 ½ cups | Sifted for light texture |
| Unsweetened Cocoa Powder 🍫 | ¾ cup | Dutch-processed preferred |
| Granulated Sugar 🍚 | 2 cups | White or light brown |
| Light Brown Sugar 🍚 | ½ cup | Packed firmly |
| Baking Soda 🧂 | 1 ½ tsp | Pure, not baking powder |
| Salt 🧂 | ½ tsp | Fine sea salt preferred |
| Unsalted Butter 🧈 | 1 ¼ cups | Room temperature, softened |
| Large Eggs 🥚 | 2 whole | Room temperature |
| Vanilla Extract 🌿 | 2 tsp | Pure, high-quality |
| Coconut Milk (Canned) 🥥 | 1 can | Full-fat, chilled overnight |
| Shredded Coconut (Sweetened) 🥥 | 2 cups | Toasted lightly for flavor |
| Powdered Sugar 🍚 | 3 cups | Confectioners' sugar |
| Heavy Cream 🥛 | 1 cup | Cold for frosting stability |
| White Chocolate Chips 🍫 | 1 ½ cups | For garnish |
| Mini Chocolate Chips 🍫 | 1 cup | For coconut layer |
The Dutch-processed cocoa powder makes all the difference here—it's smoother and less bitter than natural cocoa, giving you that classic Bounty chocolate depth. Ghirardelli or Hershey's Special Dark are my go-tos, but any high-quality brand works. For the coconut milk, full-fat canned varieties (like Thai Kitchen or Aroy-D) are essential—they create that signature creamy texture. The shredded coconut should be the sweetened, toasted kind from the baking aisle, not the unsweetened kind. Toasting it lightly in a dry pan for 2-3 minutes enhances its flavor dramatically. As for the white chocolate chips, Ghirardelli or Guittard melt the best without seizing.
No Dutch-processed cocoa? Natural cocoa powder at 1.5 times the amount works in a pinch, but expect a slightly more bitter taste. Running low on powdered sugar? Sift granulated sugar—it's not ideal, but it'll work for decorating. The coconut milk can be substituted with full-fat coconut cream (the thick part from a can of coconut milk), but you'll need to adjust the texture by adding a splash of milk. For the frosting, if you're avoiding dairy, coconut cream (chilled overnight) works beautifully—just omit the heavy cream. The white chocolate chips can be swapped for chopped white chocolate bars if you prefer a more rustic look, but they won't melt as smoothly.
Store the cake layers wrapped tightly in plastic at room temperature for up to 3 days, or in the fridge for 5 days. The frosting keeps well in an airtight container in the fridge for 5 days, though it's best used within 3 days for optimal texture. For longer storage, freeze the unfrosted layers for up to 3 months—thaw at room temperature before assembling. The coconut layer can be made a day ahead and stored in the fridge; just bring it to room temperature before spreading. Garnishes like white chocolate chips or extra toasted coconut should always be added fresh to maintain their crunch.
Why You'll Love This Recipe
- No Mixer Needed: I swear by this recipe when my mixer’s acting up—just stir, fold, and pour. The cocoa and brown sugar blend so smoothly with the flour that you won’t even need to sift, and the cake comes out perfectly moist without overmixing.
- Coconut-Cocoa Magic: That combo of cocoa powder and brown sugar? It’s like a hug for your taste buds, but the real star is the coconut layer—rich, chewy, and just sweet enough to balance the deep chocolate. Honestly, it’s the kind of flavor that makes people ask for seconds before the plate’s even empty.
- Birthday Party Ready: Between us, this cake is my secret weapon for last-minute celebrations. The layers stay intact, the frosting (if you add it) is foolproof, and it’s got that wow factor without requiring a bakery run. Plus, the coconut adds a fun texture that kids and adults love.
- Budget-Friendly Luxury: Here’s what sold me—this tastes like a gourmet dessert but costs next to nothing. Cocoa powder and brown sugar stretch far, and you can even swap in store-brand butter without sacrificing flavor. Leftovers? They disappear faster than you can say “second slice.”
Step-by-step instructions for Bounty chocolate cake
Here's how to create layers of rich chocolate cake with a tropical coconut-crusted exterior.
👨🍳 Step 1: Prepare the Cake Batter
Preheat your oven to 350°F and grease two 9-inch round cake pans, lining the bottoms with parchment paper for easy release. In a large mixing bowl, sift together the 2.5 cups all-purpose flour, 0.75 cup unsweetened cocoa powder, 1.5 tsp baking soda, and 0.5 tsp salt. Set aside.
In a separate large bowl, cream together the 1.25 cups unsalted butter (at room temperature), 2 cups granulated sugar, and 0.5 cup light brown sugar on medium speed until light and fluffy, about 3-4 minutes. Add the 2 whole large eggs, one at a time, mixing well after each addition. Stir in the 2 tsp vanilla extract until fully combined.
Gradually add the dry ingredients to the wet mixture, mixing on low speed just until combined. Avoid overmixing—you should still see some flour streaks. The batter will be thick and fudgy, which is perfect for this cake.
🍳 Step 2: Bake the Chocolate Layers
Divide the batter evenly between the prepared cake pans. Bake for 30-35 minutes or until a toothpick inserted into the center comes out clean. The cakes should be slightly domed and firm to the touch. Let them cool in the pans for 10 minutes before transferring to a wire rack to cool completely.
While the cakes are baking, prepare the coconut topping. In a small saucepan, combine the 1 can coconut milk and 1 cup mini chocolate chips. Heat over medium-low heat, stirring occasionally, until the chocolate chips melt completely and the mixture is smooth. Remove from heat and stir in 1 cup of the shredded coconut.
🥘 Step 3: Assemble the Cake with Coconut Layers
Once the cakes are completely cool, level the tops if necessary. Place the first cake layer on a cake stand or plate. Spread a thin layer of the melted chocolate-coconut mixture over the top, then sprinkle with another ½ cup of the shredded coconut. Place the second cake layer on top and repeat the process.
For the exterior, spread the remaining melted chocolate-coconut mixture evenly over the entire cake, creating a smooth base. Press the remaining 1 cup shredded coconut firmly onto the sides and top of the cake, packing it down to create a thick, textured coconut crust. Chill the cake in the refrigerator for 30 minutes to help the coconut set.
🍽️ Step 4: Prepare and Apply the Frosting
In a medium bowl, whip together the 1 cup heavy cream and 3 cups powdered sugar until smooth and fluffy. This will create a light, airy frosting that complements the rich chocolate and coconut flavors. Spread the frosting evenly over the chilled cake, creating a smooth finish.
To finish, press the 1.5 cups white chocolate chips onto the sides and top of the cake, gently warming the chips for 10-15 seconds in the microwave if needed to help them adhere. Garnish with additional shredded coconut if desired. Serve immediately or refrigerate for up to 3 days for best texture.
Pro Tips For Making Bounty Chocolate Cake
- Sift the Cocoa: DESCRIPTION: I learned this the hard way—lumpy cocoa powder makes a dense, uneven cake. Use a fine-mesh sieve to sift it directly into the dry ingredients before mixing, especially if your cocoa is clumpy. This also aerates it slightly, giving you that lighter, fudgier texture the recipe promises.
- Measure Brown Sugar Wet: DESCRIPTION: Pack that brown sugar like you’re making a snowball—tap the cup gently on the counter to settle it. Then, level it off with a knife. Too much air in your measurement? The cake will be overly sweet and dry. (Yes, even if you’re impatient like me.)
- Stop When It Springs: DESCRIPTION: The cake’s done when a toothpick comes out with moist crumbs, not wet batter. Overbaking dries out the chocolate flavor and makes the texture tough. If your oven runs hot, pull it 2–3 minutes early and let it rest—it’ll keep cooking with residual heat.
- Whisk the Eggs First: DESCRIPTION: Beat the eggs and sugars together until they’re pale and slightly thickened before folding in the dry ingredients. This adds structure and prevents a cake that’s too dense. Skip this, and you’ll end up with a sad, flat layer cake instead of the rich, moist one you’re after.
Storing and reheating your bounty chocolate cake
Room Temperature Storage
Your freshly baked Bounty chocolate cake stays moist and delicious at room temperature for up to 3 days when stored properly. Wrap each cake layer tightly in plastic wrap, then place them in an airtight container to prevent drying. The coconut topping will stay crisp if you press it firmly and avoid humidity. I like using Glad Press'n Seal containers for this—just
Fridge Preservation
For longer freshness, refrigerate the fully assembled cake (including frosting) for up to 5 days. The coconut crust will firm up slightly, but a quick 10-minute warm-up at room temperature brings it back to perfection. Store the frosting separately in an airtight container if you're not using it immediately—it keeps well for 5 days but tastes best within 3 days. The coconut layer can be prepped ahead and refrigerated for 24 hours before assembly.
Freezing Layers
Unfrosted cake layers freeze beautifully for up to 3 months. Wrap each layer individually in plastic wrap, then place them in a freezer bag with all air removed. Thaw at room temperature for 2-3 hours before assembling.
Never freeze the frosting—it becomes grainy and loses its smooth texture. For the coconut filling, you can freeze it separately for 1 month in a small airtight container. Just thaw it in the fridge overnight before using.
Reheating Slices
If you've stored slices in the fridge, reheat them for 10-15 seconds in the microwave on 50% power to restore the coconut's crispness. For a stovetop method, warm slices on a dry skillet over low heat for 30 seconds per side—this adds a subtle caramelized flavor.
Avoid reheating white chocolate garnishes, as they'll melt and lose their decorative appeal. Always serve with a cold beverage to balance the warmth. 🍫
Reviving Dried Layers
If your cake layers dry out slightly, revive them by brushing with 2 tablespoons warm coconut milk or simple syrup (equal parts sugar and water, heated until dissolved). Let it soak in for 5 minutes before frosting.
For the coconut topping, a quick 30-second microwave burst (covered with a damp paper towel) restores its texture. This trick works wonders if you've stored the cake too long or transported it in hot weather.
Nutrition facts
Frequently asked questions
Can I make this cake without fresh coconut milk?
Yes! Use 1 cup full-fat coconut cream (the thick part from a chilled can of coconut milk) plus 2 tablespoons coconut milk to replace the canned coconut milk. For an even easier swap, substitute with 1 cup heavy cream—just reduce the frosting's powdered sugar slightly (2.75 cups) to balance the richness. The texture will be slightly different but still delicious.
Why does my cake crack when I add the coconut topping?
This usually happens when the cake layers cool too quickly or aren't fully set before assembly. Let the cakes cool completely (2 hours) before adding the coconut mixture, and ensure they're at room temperature when layering. Chill the assembled cake for 30 minutes before frosting to prevent cracking from temperature shock.
How can I make this cake gluten-free?
Replace the all-purpose flour with a 1:1 gluten-free baking flour blend (like Bob's Red Mill) plus 0.5 tsp xanthan gum. For the coconut topping, use a gluten-free shredded coconut. The texture may be slightly denser, so bake the layers 2-3 minutes longer to ensure doneness. Test with a toothpick—it should come out clean.
Can I use boxed cake mix for this recipe?
Use a chocolate devil's food boxed mix (like Betty Crocker or Duncan Hines) and follow the package directions for the cake layers. For the coconut filling, melt 1 cup coconut milk with 1 cup mini chocolate chips and 1 cup shredded coconut as directed. The frosting remains the same. This shortcut saves time while keeping the signature flavors!
What’s the best way to serve this cake?
Slice and serve at room temperature for the best texture contrast—creamy frosting, tender cake, and crisp coconut. Pair with a cold glass of milk, vanilla ice cream, or a tropical cocktail like a piña colada. For a festive touch, dust with cocoa powder or add a sprinkle of crushed macadamia nuts on top.