
Desserts
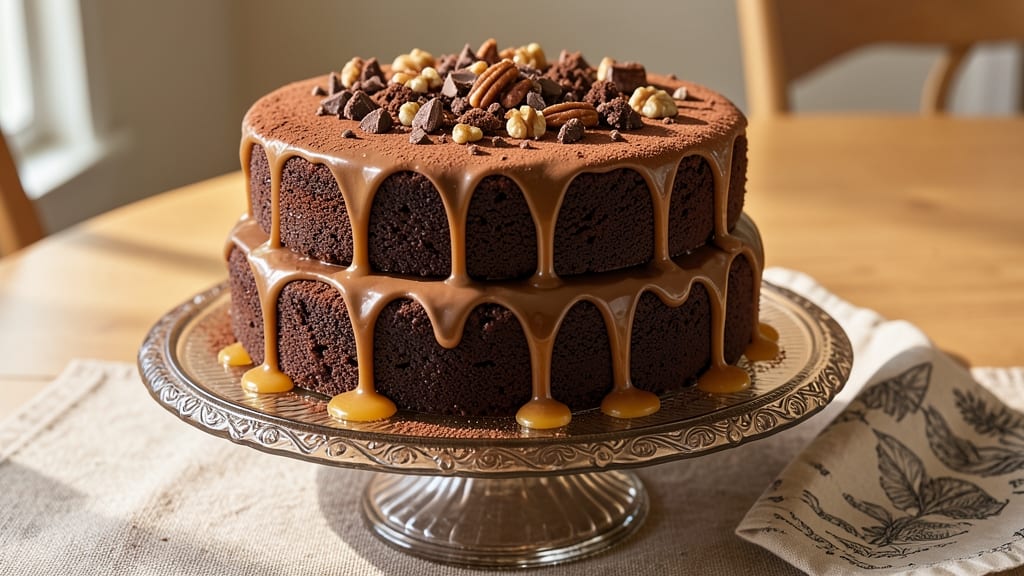
This big mountain chocolate fudge cake delivers the kind of decadence that makes every slice feel like a celebration. 💛 The secret lies in its triple-layered structure—rich, moist cake infused with coffee for depth, separated by a velvety fudge layer that melts in your mouth.
I developed this recipe after years of perfecting the balance between dense chocolate flavor and light, airy texture, ensuring each bite is a perfect harmony of indulgence.
The coffee infusion transforms ordinary chocolate cake into something extraordinary, adding subtle complexity that pairs beautifully with the fudge layer. What sets this apart is the technique: precise layering and careful baking times that prevent the cake from becoming dense or dry.
The result is a dessert that's impressive enough for special occasions but simple enough to make at home.
By the time you slice into this cake, you'll uncover layers of moist, fudgy goodness that defy expectations. The coffee notes enhance the chocolate's richness without overpowering it, while the fudge layer adds a luxurious texture contrast. This isn't just dessert—it's an experience that will leave everyone asking for seconds.
Serve with whipped cream and chocolate shavings for the full indulgence, or enjoy it as-is to savor every decadent bite. The recipe is designed to impress, whether you're celebrating a milestone or simply treating yourself to something extraordinary. Let's get baking!
Ingredients for big mountain chocolate fudge cake
Twelve decadent ingredients create a triple-layered masterpiece of coffee-infused chocolate perfection.
| Ingredient | Amount | Notes |
|---|---|---|
| All-Purpose Flour 🌾 | 3 cups | Sifted for light texture |
| Unsweetened Cocoa Powder 🍫 | 1 cup | Dutch-processed preferred |
| Granulated Sugar 🍚 | 2 ½ cups | Superfine if available |
| Light Brown Sugar 🍚 | 1 cup | Packed firmly |
| Instant Espresso Powder ☕ | 2 tbsp | For deep coffee flavor |
| Baking Soda 🧂 | 1 ½ tsp | Freshly opened |
| Salt 🧂 | ½ tsp | Fine sea salt |
| Large Eggs 🥚 | 4 whole | Room temperature |
| Unsalted Butter 🧈 | 1 ½ cups | Softened, not melted |
| Buttermilk 🥛 | 1 cup | Fresh, not powdered |
| Vanilla Extract 🌿 | 2 tsp | Pure, high-quality |
| Heavy Cream 🥛 | 1 ½ cups | Cold for fudge layer |
| Powdered Sugar 🍚 | 2 cups | For fudge layer |
| Dark Chocolate Chips 🍫 | 1 ½ cups | 70% cocoa or higher |
| Chocolate Shavings 🍫 | ½ cup | For garnish (optional) |
| Whipped Cream 🍦 | 2 cups | For serving (optional) |
The cocoa powder and instant espresso are non-negotiable for that deep, complex flavor. Valrhona or Guittard cocoa powder delivers the most velvety texture, but Hershey's Special Dark works in a pinch. Instant espresso powder (not grounds) dissolves smoothly—Starbucks or Nescafé are reliable brands. For the butter, Plugrá or Land O'Lakes unsalted is my go-to, but European-style butter like President adds extra richness. The buttermilk should be fresh—if it's curdled, strain it first. And don't skip the vanilla extract; Heinz or Nielsen-Massey pure extract makes all the difference.
No instant espresso? Strong brewed coffee cooled works, but you'll need about 1/2 cup. Substituting cocoa powder? Natural unsweetened cocoa at the same amount, but Dutch-processed gives that signature smoothness. Running low on buttermilk? Mix 1 tbsp vinegar or lemon juice with 1 cup milk and let sit 5 minutes. For the fudge layer, if you can't find dark chocolate chips with 70% cocoa, Ghirardelli or Callebaut are solid alternatives. The whipped cream can be homemade (just heavy cream and powdered sugar) or store-bought—Cool Whip is fine for casual serving.
Store the cake layers wrapped tightly in plastic at room temperature for up to 3 days, or in the fridge for 5 days. The fudge layer keeps well too—cover it tightly and it'll stay velvety for 1 week. For maximum freshness, assemble the cake the day you serve it. The chocolate shavings and whipped cream should be added just before serving to prevent sogginess. This cake freezes beautifully—wrap each layer individually and freeze for up to 3 months. Thaw overnight in the fridge before assembling.
Why You'll Love This Recipe
- No Mixer Needed: Mixing this cake is just a matter of stirring—no electric mixer, no fuss. The cocoa and brown sugar blend into a thick, velvety batter that practically folds itself together.
- Deep, Coffee-Kissed Richness: That pinch of instant espresso powder? It’s the secret weapon—intensifies the chocolate flavor without tasting like coffee. The result? A fudge cake so decadent it’ll make you forget store-bought exists.
- Weeknight Crowd-Pleaser: Bake it for dinner guests or a family night in—it’s always a hit. The texture stays moist for days, and the chocolate flavor is so universally loved, even picky eaters ask for seconds.
- Budget-Friendly Indulgence: Uses pantry staples (flour, sugar, cocoa) and stretches to feed 8+ without breaking the bank. Leftovers? They’re even better the next day—if they last that long.
Step-by-step instructions for big mountain chocolate fudge cake
Here's how to build layers of rich, moist chocolate perfection with coffee depth and fudge texture.
👨🍳 Step 1: Prepare the Cake Batter Foundation
Preheat your oven to 350°F and grease three 9-inch round cake pans with butter or baking spray, then line the bottoms with parchment paper. Sift together the 3 cups all-purpose flour, 1 cup unsweetened cocoa powder, 1.5 tsp baking soda, and 0.5 tsp salt in a large bowl. This dry mix is your flavor base—set it aside for now.
In a separate large mixing bowl, cream the 1.5 cups softened unsalted butter with the 2.5 cups granulated sugar and 1 cup packed light brown sugar on medium speed until light and fluffy—about 3-4 minutes. This step is crucial for aerating the batter and creating that tender crumb. Scrape down the sides of the bowl with a spatula to ensure even mixing.
🍳 Step 2: Build Moisture and Coffee Depth
Add the 4 room-temperature large eggs one at a time, mixing well after each addition. Then stir in the 2 tbsp instant espresso powder and 2 tsp vanilla extract. The espresso powder will dissolve completely—this is your secret to that deep, coffee-infused chocolate flavor without tasting like coffee alone.
Alternate adding the dry flour mixture and 1 cup buttermilk beginning and ending with the flour. Mix on low speed just until combined—overmixing develops gluten and makes the cake dense. The batter should be thick but pourable. Divide the batter evenly among the prepared cake pans, smoothing the tops with a spatula.
🔥 Step 3: Bake to Perfect Doneness
Bake the cakes in the preheated oven for 25-30 minutes, or until a toothpick inserted into the center comes out with just a few moist crumbs (not wet batter). Rotate the pans halfway through baking for even browning. The cakes should be slightly domed in the center—this indicates they're done without being overbaked.
Remove from the oven and let the cakes cool in their pans for 10 minutes, then transfer to a wire rack to cool completely. The cooling process is critical—it allows the cakes to set properly before frosting. If you try to frost them while warm, the filling will melt and create a soggy mess.
🥘 Step 4: Create the Fudge Layer
In a medium saucepan, combine the 1.5 cups heavy cream and 1.5 cups granulated sugar. Bring to a boil over medium-high heat, stirring until the sugar dissolves completely. Remove from heat and let the mixture sit for 2 minutes—this resting period helps the sugar caramelize properly.
Return the pan to low heat and carefully whisk in the 2 cups powdered sugar and 1.5 cups dark chocolate chips. Stir constantly until smooth and thickened—about 3-4 minutes. The mixture should coat the back of a spoon and hold its shape when dropped from a spoon. Pour the fudge layer onto a parchment-lined baking sheet and let it cool completely before spreading.
🍽️ Step 5: Assemble and Serve
Once all layers are completely cool, place the first cake layer on a serving plate. Spread a thin layer of the cooled fudge mixture over the top, then add the second cake layer. Repeat with another layer of fudge, then place the final cake layer on top. Press down gently to create a level surface.
Spread the remaining fudge mixture over the entire cake, creating a smooth, even layer. Chill the cake in the refrigerator for at least 2 hours to allow the fudge to set. Before serving, garnish with the 0.5 cup chocolate shavings and top with 2 cups whipped cream for a restaurant-quality finish. Each slice should deliver moist, rich chocolate layers with that perfect balance of coffee depth and fudge texture.
Pro Tips For Making Big Mountain Chocolate Fudge Cake
- STIR THE DRY INGREDIENTS: Mix the flour, cocoa powder, and espresso powder together before adding wet ingredients—this prevents clumping and ensures even distribution of that deep, coffee-chocolate flavor. I learned this the hard way when my first batch had weird dry pockets near the cocoa.
- MELT THE BUTTER FULLY: Use a microwave or stovetop to melt the butter until it’s completely liquid—no lumps, no solids. Cold butter pockets make the cake dense and unevenly moist. I was skeptical until I tried it: the texture becomes rich and velvety instead of greasy.
- DON’T OVERMIX THE BATTER: Stop mixing as soon as the flour disappears—overworking it introduces too much air, which can cause the cake to sink or develop a tough crumb. Two minutes max after adding the flour, then scrape the bowl clean. This isn’t the prettiest method, but it’s the tastiest.
- CHILL THE BATTER: Let the batter sit for 10-15 minutes before baking—this helps the flavors meld and prevents a domed top. I skip this when I’m lazy, but the difference in depth of flavor and even rise is noticeable. (Your future self will thank you.)
Make-ahead tips for this recipe
Layer Prep Ahead
Bake the cake layers up to 3 days in advance and store them individually wrapped in plastic wrap at room temperature. The fudge layer can be made 2 days ahead and stored in an airtight container at room temperature.
I always prep the cake layers first—they keep beautifully without drying out, while the fudge stays velvety smooth when properly sealed. 💛
Freezer-Friendly Assembly
For maximum convenience, freeze the assembled cake (without whipped cream or chocolate shavings) for up to 3 months. Wrap each layer tightly in plastic wrap, then place in a freezer bag with all the fudge layers between them.
Thaw overnight in the fridge before adding toppings. This method preserves the texture perfectly—no soggy surprises!
Fudge Layer Refresh
If your fudge layer develops a skin after refrigeration, simply reheat it in 10-second bursts in the microwave, stirring between each burst until smooth again. For a smoother spread, let it sit at room temperature for 15-20 minutes before reassembling.
I've found this trick works best with the cold heavy cream base—it prevents graininess when reheated. ✨
Serving Timeline
Plan to serve this cake 4-6 hours after assembly for the best texture contrast. The fudge layer will firm up slightly in the fridge, creating that perfect semi-solid bite that melts beautifully.
For a room-temperature serving, let it sit for 1 hour before slicing—this enhances the coffee-chocolate depth without making the cake too warm. 🌟
Make-Ahead Garnishes
Prepare whipped cream and chocolate shavings separately up to 2 days ahead. Store whipped cream in an airtight container in the fridge, and keep chocolate shavings in a cool, dry place in a sealed jar.
Add them just before serving to prevent sogginess—this keeps the cake looking fresh and the toppings crisp. A sprinkle of flaky sea salt right before serving also elevates the flavors! 💡
Portioning for Parties
For large gatherings, cut the cake into 12 equal wedges before serving. Use a serrated knife heated in hot water for clean slices. Wrap individual portions in parchment paper and store at room temperature for up to 24 hours—this keeps each slice perfectly moist.
Label them with the occasion (birthday, anniversary) for a personal touch! 🎉
Nutrition facts
Frequently asked questions
Can I make this cake in a smaller pan?
Yes! For a single-layer version, use a 9-inch pan and reduce all ingredients by 1/3. The fudge layer should also be halved. Bake time remains 25-30 minutes at 350°F, but check for doneness with a toothpick. The coffee-chocolate flavor works beautifully in smaller portions too!
Why does my cake taste bitter?
Bitterness usually comes from overmixing the batter or using too much cocoa powder. Mix just until combined, and stick to 1 cup cocoa as written. For extra richness, try Dutch-processed cocoa like Valrhona. Also, avoid overbaking—pull the cakes when a toothpick has just a few moist crumbs.
How do I fix a cracked fudge layer?
Gently reheat the fudge in 10-second microwave bursts, stirring between each, until smooth. Spread it back over the cake while still warm. For prevention, chill the cake for 2 hours before adding toppings—this helps the fudge set evenly. A cracked layer won't ruin the flavor, just the presentation!
Can I substitute coffee extract for instant espresso?
Yes! Use 1.5 teaspoons coffee extract instead of the 2 tbsp instant espresso. The flavor will be slightly different but still adds depth. For best results, use high-quality extract like McCormick. The coffee infusion enhances the chocolate without overpowering it—just like the original!
What's the best way to cut this cake?
Use a serrated knife warmed in hot water for clean slices. Dip the knife between cuts to prevent crumbs. For parties, cut into 12 equal wedges before serving. The fudge layer makes each slice decadent—serve with whipped cream to highlight the textures!